This is a great project for keeping track of the herbs you learn. It’s easy to carry around and won’t take up much space in your backpack or pocket. It’s great to take along on hikes to identify and collect new herbs too!
What you will need:
- 1 sheet of cardstock or construction paper, any color (this will be the cover pages);
- 1 package of 3 x 5 index cards (lined or unlined);
- Clear packaging tape;
- Hole punch;
- Scissors;
- Paper cutter or straight edge;
- Twine or yarn;
- Pens, markers, colored pencils, herb magazines, seed catalogs or any other medium to decorate cover.
For the cover:
Crop cardstock down to 7 1 / 2” x 11” using the paper cutter or ruler and scissors.
Cut the large piece into two small pieces 7 1 / 2” x 5 1 / 2”. For each Herbarium you make, you will need one of these sheets.
Fold the sheet in half and decorate the cover. Be creative! Write your name on it if you wish, draw herbs or decoupage pictures cut from seed catalogs or magazines. Make it yours!
When you are finished decorating the cover, cut pieces of packaging tape twice the length of the cover and laminate the cover with the tape. We used 4 pieces total to do this step.
For the inside pages:
Using the hole punch, punch 2 holes at the top of the index cards. To keep everything lined up, use the sides as a guide and rest the hole punch as far in as you can. Then line it up between the red line and edge. Do this to as many index cards as you’d like to start your book off with.
Assembling the Herbarium:
Take one index card and center it horizontally on top of the cover. I like to keep about 1 / 4 – 1 / 2 inch space between the top of the index card and the top of the cover to allow for plenty of room inside for the cards.
Slide the hole punch over the cards (I found it helpful to turn the hole puncher upside down to see the holes in the card more easily) and punch the holes in the cover.
Place all the cards you have punched inside the book, cut off two equal pieces of twine or yarn (about 3” should do) and tie with bows. This will allow you to take apart the book as you need it to add or remove pages.
Now, you are ready to fill it up!
On your next herb walk, bring along the Herbarium, a small role of packing tape (extra wide scotch tape may work as long as it is very sticky), small scissors or a pocket knife for cutting the tape and herbs and a pen!
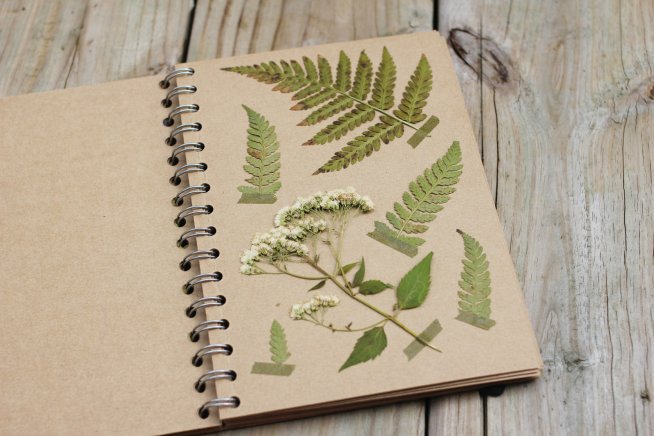
When you find a specimen you want to keep, carefully cut a small sample of every part (i.e. Leaf, flower, seed heads, possibly even roots if small enough) of plant and arrange it on an index card.
Whatever other information you add is your choice. Some ideas are:
- the location where you found it (if it is not commonly found where you are)
- which parts of the herb are used
- what it’s commonly used for
- what forms it’s used in (i.e. teas, extracts, salves, poultices, etc)
- best time for harvesting
- any cautions for using the herb
This simple pocket Herbarium will make it easy for you to quickly identify and remember herbs and their uses when you need them!
If you are unable to harvest a real herb, you can find a picture on the internet, print it off and glue or tape it into the spot where the actual plant would go. Then, later if you find an actual plant specimen, you can replace it with the real thing!
Make a photo of your herbarium and upload it to the App! Write briefly how you are going to use it or describe your last herb walk!
If you enjoyed this activity, you may also like the following activity, too
-

-

Read your kid autumn poems!
5 to 8 years -

-
Experiments with magnets and springs
5 to 8 years -
Make origami crafts!
5 to 8 years -
Craft an ABC book
5 to 8 years -

Offer your kid to draw with Spirograph!
5 to 8 years -
Play chess with your child
5 to 8 years -
Play Barley-break with your kid!
5 to 8 years